Can I add a new event to the calendar?You can add new events to your personal calendar. To add new event to calendar, you may follow these steps: - Click "Dashboard" from Navigation block.
- Click "Customize this page".
- Select "Upcoming Events" from dropdown menu.
- Click "New event" link under Upcoming Events block.
- Fill the mandatory fields marked by *.
- Click "Save changes".
New event will be added to Upcoming Events list. If you want you can also add a calendar, you may select "Calendar" from "Add a block" dropdown menu. |
Can I restrict access of my students to resources under selected conditions?You can restrict access of your students to resources or activities due to: - a graded online or in-class activity
- student information
- selected dates
While adding a resource and an activity you may configure the conditions using "Restrict Access" section. For more information: https://docs.moodle.org/26/en/Conditional_activities_settings |
Can users who are not ODTU affiliates use ODTUClass?ODTUClass is a learning management system which serves to instructors and students, therefore it serves to ODTU users. However, due to the request of the instructor, a user who is not an ODTU affiliate can be added by administrators. Please, send a mail to odtuclass@metu.edu.tr including the reason of request and name, surname and email of the user. |
How can I add a midterm grade?You can add columns to Grades manually to add grades for classroom activities such as midterms or quizzes. To add a new column (grade item),you may follow these steps: - At the course page, click "Grades" option from the Course Administration.
- Click "Categories and Items" link under "Setup" block.
- Scroll to the bottom of the page and click "Add grade item" button. The New grade item page will open.
- Enter an "Item name" (for example: Midterm 1).
- Enter the "Maximum grade" value for this grade. Maximum grade depends on the aggregation method. For more information about aggregation methods please visit: "What is aggregation" FAQ entry.
- Click "Save changes" button.
After adding a new grade item, you can follow these steps to manually enter grades: - Click "View" tab to return to "Grader Report" where you will find the list of enrolled students.
- Click "Turn editing on" button. Grade cells will change to entry fields.
- Enter the grades to the fields.
- When you finish entering grades, scroll to the bottom of the page and click "Save Changes" button. Otherwise, all the grades you entered will disappear.
|
How can I add a quiz?The Quiz activity lets you administer a wide range of questions within a specific layout and order, provide different kinds of feedback based on how a student performed on the quiz, and control the ways that students can access the quiz. To add a Quiz activity, please follow these steps: - Go to course page.
- Click "Turn editing on".
- Click "Add an activity or resource" link on a week/topic you want to add Attendance activity.
- Select "Quiz" from the list and click "Add" button.
- General settings of activity will be displayed. Type a name for the activity which will be displayed on course page (e.g. Quiz 1).
- If you want to inform students about the quiz, you may add these instructions and information to "Description" box.
- Using "Timing" section, you can determine when will the quiz start, when will it end and how long will students have to answer questions. Click "Enable" boxes in order to adjust timing options.
- Using "Grades" sections, you can determine how many attempts are allowed and if multiple attempts are allowed which grade will be counted as the grade of this quiz.
- After completing settings, click "Save and Return" button.
When a quiz is saved, the activity is ready but you need to add questions. To add questions, please follow these steps: - Click on the name of the quiz.
- If there are no questions added, "Edit quiz" button will be displayed. Click this button. Click "Add" menu which is located on the right bottom of the window. Select the appropriate option. The options are:
- a new question: Question Types dialog box will open and you are required to select which type of question you want to add. After question type selection, you will determine question, options and correct answer. Each new question will be added to Question Bank of your course.
- from question bank: You can create questions before quiz and add them to Question Bank. If so, you may select the questions from question bank to add the quiz.
- a random question: You need to create questions and add them to Question Bank before creating the quiz. Then, you may select how many random questions from question bank to be chosen.
- After adding all the questions, check "Maximum grade" box. If you need to change it, type the new maximum grade and click "Save" button.
- Quiz is ready.
For more information please visit "Öğretim Elemanları için ODTÜClass Kullanıcı Kılavuzu" page:43. |
How can I change my password?ODTUClass takes user information from ODTU central servers, therefore you can not change password on ODTUClass. CC provides more information about how to change password: http://faq.cc.metu.edu.tr/groups/password |
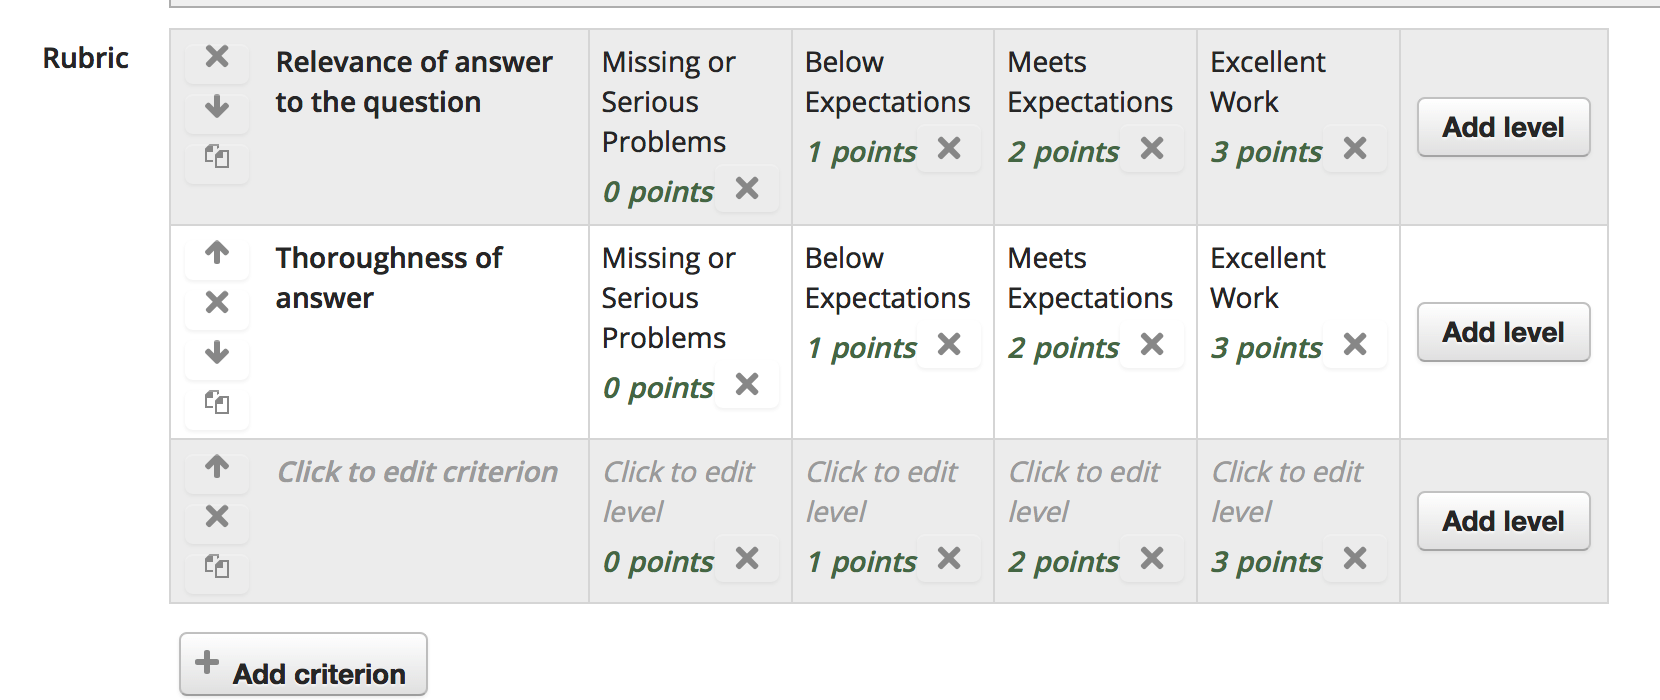
How can I create a rubric for an assignment?Rubrics are an advanced grading method used for criteria-based assessment. The rubric consists of a set of criteria plotted against levels of achievement. A numeric grade is assigned to each level. In order to create an assignment which will be graded with a rubric, you may follow these steps: - Go to course page.
- Click "Turn editing on" button.
- Click “Add an activity or resource” link on the week/topic you want to add the assignment.
- Select “Assignment” and click “Add” button.
- Fill the mandatory fields marked by * such as "Assignment name".
- Expand "Grade" topic by clicking.
- Select "Rubric" from "Grading method" drop-down menu.
- Click "Save and Display" button.
You will be directed to Advanced Grading wizard. You may follow these steps to create the rubric: - Click "Define new grading form from scratch".
- Type a name for your rubric.
- If you want, you may add a description about this rubric.
- Fill the rubric table:
- Click and add a criterion.
- Define levels by clicking on the level titles.
- Change points values if needed by clicking on values.
- Delete a criterion by clicking on "x" button on the left of the criterion title.
- Duplicate a criterion by clicking on "
 " button on the left of the criterion title. " button on the left of the criterion title. - Change criterion order by using arrows on the left of the criterion title.
- Click "Add level" button to add a new level.
- Click "Add criterion" button to add a new criterion.
- Check the "Rubric options" and uncheck options that do not match with your plan.
- Click "Save and make it ready" button if your rubric is ready. Otherwise, click "Save as draft" in order to continue editing.
For more information, you may visit Moodle Docs. |
How can I download students’ answers with questions in the quiz?To download students’ answers with the questions in the quiz, you can follow these steps: - At the course page, click the quiz.
- Click "Results" menu from "Quiz Administration" block.
- Click "Archive" under “Result” section.
- In the opening page right click and save the page on your computer or you can start printing and save as PDF.
|
How can I enter course pages?Students will be added to their courses throughout the semester as ODTÜClass is synchronized with Student Affairs Information System (OIBS). For students to officially complete their registration, their courses should be approved by the advisors. If registration is "Not Approved", the students will see no course. If registration status is "Approved" but add-drop status is "Not Approved", students will see the courses they have added during registration and changes during add-drop will not be reflected to ODTÜClass. Once users login ODTÜClass, they are directed to Dashboard. On dashboard, users will see the list of courses they are enrolled. By clicking on the course name, users will reach course page. |
How can I evaluate the students' exams in the order of questions?To grade one essay type question for all students and continue with the next one you can follow these steps: 1. At the course page, click the quiz. 2. Click "Results" menu from "Quiz Administration" block. 3. Click "Manual Grading" under “Result” section. 4. Essay type questions in the quiz will be listed in the opening page. Click "Grade all" link at the last column of the table. 5. In the "Options" section, select one of the "By student ..." options from "Order attempts" drop-down menu. 6. Click "Change options" button. In the opening page answer of the question you have chosen will be seen. You can see answers of all students by clicking "Save and go to next page" button at the end of the page. |
How can I let my colleague see my course materials?You can add your colleagues as "Non-editing teacher" to your course. Non-editing teachers can only visit your course page but cannot editing anything. To enroll a non-editing teacher you can follow these steps: - Go to the course page.
- Click "Users" menu from the Course Administration.
- Click “Enrolled users” option and list the enrolled users.
- Click "Enroll users" button on the top right of the list.
- A pop-up window will appear. On this window search the list of users to find your colleague typing e-mail address to "search" box. When you find your colleague click on the user and you will see that your colleague's name is added next to "Select Users" title.
- On this window select “Non-Editing Teacher” option from the "Assign role" dropdown menu.
- Click “Enroll users” button.
|
How can I login ODTÜClass?ODTÜClass serves as the learning management system for ODTÜ. You can login to ODTÜClass with your METU user-id (exp: abcd or e123456) and password. |
How can I make blocks visible during a quiz?During a quiz, course blocks are hidden by default. To make block visible, you can follow these steps: - At the course page, click the quiz.
- Click "Edit settings" menu from "Quiz Administration" block.
- Click “Appearance” in the opening page.
- Click “Show more” in the opening section.
- Select “Yes” from “Show blocks during quiz attempts” drop-down menu.
- Click “Save and return to course” or “Save and display”.
|
How can I restore a course?In order to reach the contents of a course that you have backed up, you need to "Restore" it. To restore a course, you may follow these steps: - Go to course page.
- Click "Restore" option from the Course Administration.
- Drag the .mbz file that you have downloaded and drop it to Import a backup file area.
- Click Restore button.
- Click "Continue" button.
- Select Merge the backup course into this course option from Restore into this course section.
- Click "Continue" button.
- Click "Next" buttons to proceed.
- Click "Perform restore" button on the last page.
- When the system completes the process click "Continue" button and return to course page.
|
How can I set badges up to the course?Badges are a way of celebrating success.Badges are awarded according to various criteria.To create badges you may follow these steps: - Go to your course.
- Click "Settings" from "Course Administration"
- Click "Manage badges".
- Click "Add a badges"
- Fill the mandatory fields marked by *.
- You will be taken to the "Criteria" tab.
- From the drop-down menu choose to "Add badge criteria":
- Manual issue by role: all enrolled users on the course with a certain role
- Course completion: the student will need to have been marked as completing the course to get the badge.
- Activity completion: based on the student completing an activity.
- You must define which criteria must be completed to receive the badge.
- Click "Save".
- Click "Enable access" at the top of the page.
|
How can I show students the deadline of activities?There are two ways advised to show the deadlines of the activities to your students. - Students can see the deadline of the activities in "Upcoming Events' block on your course page. The names and the deadlines of the activities are automatically transferred to this block. Moreover, it is possible to view all the activities and their deadlines by simply clicking "Go to calendar" button on the same block.
- If you want the deadlines to be shown under the assignment itself, you can see "Description" section you face while adding the activity. On the other hand, if the activity has already been added to the system, and you want to add a deadline after, you need to click "Edit" and "Edit settings" in sequence. Then, enter the deadline in "Description" section and select " Display description on course page" option. Finally, click "Save and return to course" button. The deadline of the activity will appear below the activity itself.
|
How can I take attendance online?In order to take attendance online, you may use "Attendance" activity. To add "Attendance" activity to your course, please follow these steps: - Go to course page.
- Click "Turn editing on".
- Click "Add an activity or resource" link on a week/topic you want to add Attendance activity.
- Select "Attendance" from the list and click "Add" button.
- General settings of activity will be displayed. Type a name for the activity which will be displayed on course page. The default value is "Attendance".
- Using "Grade" section you may determine the grading policy for attendance. If you do not want to grade attendance from "Type" dropdown menu, please choose "None".
- Using "Extra restrictions" section you may limit network addresses. If you know the subnetwork addresses, please type them separated with commas.
- After completion of settings, click "Save and display" button.
To add sessions to "Attendance" activity, please follow these steps: - Click on "Add Session" tab.
- Using "Add Session" section, set session timing.
- Using "Multiple Sessions" section, you may add repeating sessions.
- Using "Student Recording" section, you may let students to record their own attendance.
- Enable student recording by clicking "Allow students to record own attendance" box.
- Select appropriate option from "Automatic marking" dropdown menu. "Automatic marking" dropdown menu options are:
- Disabled: Students need to click on the activity and type the password.
- Yes: Students will be automatically marked depending on their first access to the course.
- Set unmarked at end of session: Any students who have not marked their attendance will be set to the unmarked status selected.
- "Student password" option determines if a password will be required for students to record attendance. Select appropriate option. The options are:
- Type a password in the text box. This password will be same for all sessions created.
- Leave the text box empty, if you do not require any passwords.
- Click on "random password" box. After saving the session click "Sessions" tab. You will see the sessions and on the "Actions" coloumn you will see a key icon (). Click on the key to display random password. You need to give this password to students in order them to record attendance.
- "Include QR code" option is not recommended since it is not working properly.
Click "Save changes". To list the sessions, please click on "Sessions" tab. To display the attendance of students, please click "Report" tab. |
How can I upload my grades to gradebook?You can enter your grades in a file in your computer, and then upload it to ODTUClass. For that, you can follow the next steps: - Save your grades document as a "CSV file".
- This file should include a column such as id number or email to identify students.
- To be sure, open .csv file with a text editor (such as Notepad):
- Check the separator. In most cases separator is either comma or semicolon.
- Check the decimal separator: It should be "dot (.)".
- Go to ODTÜClass and open course page.
- Click "Grades" option from Course Administration.
- Click "Import" tab. "CSV file" tab will also be chosen.
- Drag and drop your .csv file to "File" box.
- Select the separator (step 2) of your file.
- Click "Upload Grades" button.
- Check "Import Preview".
- ODTÜClass will be matching the students in your file with the list of enrolled students according to your selection at the "Identify user by" section:
- Select the column title of the student idenfier from "Map from" dropdown menu.
- Select the matching data from "Map to" dropdown menu.
- From "Grade item mappings" section find the grade item you want to import and select the column title of the grades in your file using the dropdown menu.
- Click "Upload grades" button.
|
How to add a Group Choice activity?Before adding a Group Choice activity, empty groups should be created. To create groups you may follow these steps: - Go to the course page.
- Click "Users" from the Course Administration.
- Click "Groups".
- On the new page, click "Auto-create groups" button.
- On the Auto-create Groups page:
- You can change the "Naming Scheme" where @ represents letters, # represents numbers.
- To create groups according to number of members per groups, change "Auto create based on" option.
- Define the number of groups to be created or the number of members per groups.
- Select "No allocation" from "Allocate members" dropdown menu.
- Click "Submit" button to save changes.
To add a Group Choice activity you may follow these steps: - Go to the course page.
- Click "Turn editing on" button.
- Click "Add an activity or resource" link.
- Select "Group Choice" and click "Add" button.
- From the Group Choice settings you should name the activity and add description. You may also set the available dates for the activity.
- When you finish settings, click "Save and return to course" button.
Students should click on this activity and select the group that they want to join. Students can also see the names of other group members. |
How to add an assignment?The assignment activity allows instructors to collect work from students, review it and provide feedback including grades. The work students submit is visible only to the instructor and not to the other students unless a a group assignment is selected. Students can submit any digital content (files) and/or instructors can ask students to type directly into a text field. An assignment activity can also be set up to not accept any student submissions and serve as a reminder to students of a 'real-world' assignment they need to complete and to record grades in ODTUClass. To add an “Assignment”, you may follow these steps: - Go to course page.
- Click "Turn editing on" button.
- Click “Add an activity or resource” link on the week/topic you want to add the assignment.
- Select “Assignment” and click “Add” button.
- Fill the mandatory fields marked by *.
- Configure other options if you need.
- Click either “Save and return to course” or “Save and display”.
|
How to add Outcomes?Instructors can define Outcomes for their courses. To add Outcomes, you may follow these steps: - Navigate to course page.
- Click Outcomes from Course Administration block.
- Click the 'Add a new outcome' button.
- Fill the required fields.
- Select a scale.
- There are 2 predefined scales:
- Separate and Connected ways of knowing: Mostly separate knowing, Separate and connected, Mostly connected knowing
- Default competence scale: Not yet competent, Competent
- Instructors can also define new scales. To add new scales click on "Add a new scale" link while adding a new outcome
- Click 'Save changes' button.
|
How to add resources such as lecture notes?To add a file as a resource: - Go to course page and click "Turn editing on" button.
- Drag the file you want to add and drop on the related week.
|
How to add students to my course?If the students are registered to your course, when they login to ODTU-Class, they will automatically be users of the course. If you want to add a student who is not officially registered to the course, you may follow these steps: - Go to course page.
- Click "Users" from the Course Administration.
- Click "Enrolled users" from the menu.
- Click "Enroll users" button on the top right of the list.
- A pop-up window will appear. Type username or id number of the student in Search area.
- Find the corresponding person from the presented list and click to select.
- Select "Student" from Assign Roles dropdown menu.
- Click "Enrol Users" button.
|
How to add weeks to a course? To add weeks to your course you may follow these steps: - Go to the course page.
- Click "Edit Settings" from the Course Administration.
- Click "Course Format" title to expand the section.
- From "Number of sections" dropdown menu, select the total number of weeks you want your course to be.
- Click "Save changes" and new week(s) will be added to your course page.
|
How to backup my course?You can backup the course structure and materials, download as a compressed file and restore to another course. To backup a course, you may follow these steps: - Go to course page.
- Click "Backup" option from the Course Administration.
- Click "Next" buttons to proceed.
- Click "Perform Backup" button on the last page.
- When the system completes the process, click "Continue" button.
- Find the compressed file from "User private backup area" and click "Download" to download the file.
|
How to block concurrent connections to a quiz?Users are only allowed to log in to ODTÜClass once. With this setting, after logging into ODTÜClass from a device or browser, if the user logs in on a second device or browser, the session on the first device is terminated. However, in order to terminate
the session on the first device, students must click a button or link on the first device. In addition you can "Block concurrent connections" to a quiz activity. This add-on prevents a student from starting an attempt in the quiz activity with more than one device and/or browser. If the student needs to change the device, closes the internet
browser accidentally or internet connection is lost, the instructors must let the student to continue the exam via a different connection. Therefore, if you will enable this option, please inform your students and provide a communication option (email, chat, etc.) during the exam for students to inform you when they need to change connection. Concurrent login limitation does not prevent login from Moodle mobile app. Logins from Moodle mobile application are also blocked with Block concurrent connections extension.
In order to block concurrent connections: - Open the quiz settings page.
- Click Extra restrictions on attempts title.
- Click "Show more" link.
- Check Block concurrent connections box.
- Click on one of the Save buttons.
To allow a student to change browser or device during an attempt:- Click on the quiz activity.
- Click "Attempts: N" link on quiz information page or click Results on Quiz Administration block.
- Find the student you want to permit connection change from attempts table.
- Click "Review Attempt" link under the name of the student.
- Click "Allow student to continue this attempt using other device" link on Block concurrent connections block.
|
How to calculate course total using weights?To calculate course total grade using weights, you need to use "Weighted Mean of Grades" aggregation option. To select/change the aggregation option you can follow these steps: - Go to the course page.
- Click on "Grades" link from the Course Administration.
- On the top of the page, click "Setup" tab.
- "Categories and Items" table will be opened of which in the first row of this table the name of your course is written. From the first row click "Edit" link in the Actions column.
- Click "Edit settings" option on the pop-up menu.
- Under the "Grade category" section there exists an "Aggregation" option. From "Aggregation" dropdown menu select "Weighted Mean of Grades" option.
- Click "Save changes" button.
- A new column for weights will be added to "Categories and Items" table. Enter the weight for each grade item.
- Click "Save changes" button.
Please note that, total of weigths should be equal to Max Grade of Course Total for correct calculation. |
How to change the language of the course?To change the language of your course to Turkish you may follow these steps: - Go to the course page.
- Click "Edit Settings" from the Course Administration.
- Click "Appearance" title to expand the section.
- Click "Türkçe" option from "Force language" dropdown menu.
- Click "Save changes" and the interface for your course will change to Turkish.
|
How to create a consent form from template?Within the scope of the Personal Data Protection Law No. 6698 (KVKK), a consent will be needed to use video-conferance tools. A consent form template is prepared. In order to create a questionnaire activity using the template please follow these steps: - Go to course page.
- Click Turn editing on.
- Click "Add an activity or resource" link on the section where you want to add the questionnaire.
- Select "Questionnaire" from the list.
- Type a name for the Questionnaire.
- Add a description if needed.
- From Availability section, set available dates if needed.
- Click "Response Options".
- Set "Type" option as "Response Once".
- Set "Students can view ALL responses" option as "Never" to prevent students seeing each other's answers.
- Click "Content Options".
- Click "KVKK Açık Rıza Formu/Consent Form For Turkish Personal Data Protection [TEST Course]" from list of templates.
- Click either "Save and return to course" or "Save and display".
|
How to create a Turnitin Assignment?To add a “Turnitin Assignment”, you may follow these steps: - Go to course page.
- Click "Turn editing on" button.
- Click “Add an activity or resource” link on the week/topic you want to add the assignment.
- Select “Turnitin Assignment” and click “Add” button.
- Fill the mandatory fields marked by *.
- Configure other options if you need.
- Click either “Save and return to course” or “Save and display”.
For more information: Turnitin Moodle Integration Instructor User Manual |
How to create Groups?You can create groups automatically or manually. To create groups manually you may follow these steps: - Go to the course page.
- Click "Users" from the Course Administration.
- Click "Groups".
- On the new page, click "Create group" button.
- On the Create Group page define enter the name of the group. You may also insert a definition or picture for the group. Then click "Save changes" button.
- To add students to this group click "Add/remove users" button.
- Search and select the students from the list.
- Click "Add" button.
To create groups automatically you may follow these steps: To create groups you may follow these steps: - Go to the course page.
- Click "Users" from the Course Administration.
- Click "Groups".
- On the new page, click "Auto-create groups" button.
- On the Auto-create Groups page:
- You can change the "Naming Scheme" where @ represents letters, # represents numbers.
- To create groups according to number of members per groups, change "Auto create based on" option.
- Define the number of groups to be created or the number of members per groups.
- Select an appropriate choice from "Allocate members" dropdown menu:
- No allocation: Empty groups will be created. You can either add students manually or add a Group Choice activity to allow your students to select their groups.
- Randomly: Enrolled students will be randomly assigned to groups.
- Alphabetically by first name, last name or Alphabetically by last name, first name: Enrolled students will be alphabetically assigned to groups according to your choice.
- Click "Submit" button to save changes.
|
How to edit the title of a resource?- To be able to enable editing click "Turn editing on" button.
- You will see a pencil icon, representing "Edit title" option, next to the resource title. Click pencil icon.
- Type the new title.
- Press "Enter" to save the changes.
|
How to enroll a guest student?To enroll a teaching assistant you can follow these steps: - Go to the course page.
- Click "Users" menu from the Course Administration.
- Click “Enrolled users” option and list the enrolled users.
- Click "Enroll users" button on the top right of the list.
- A pop-up window will appear. On this window select “Guest Student” option from the "Assign roles" dropdown menu.
- Search the list of users to find your student's e-mail address.
- Find the student among the search results and click "Enroll" button.
- Click “Finish enrolling users” button.
|
How to enroll a teaching assistant?To enroll a teaching assistant you can follow these steps: - Go to the course page.
- Click "Users" menu from the Course Administration.
- Click “Enrolled users” option and list the enrolled users.
- Click "Enroll users" button on the top right of the list.
- A pop-up window will appear. On this window select “Teaching Assistant” option from the "Assign roles" dropdown menu.
- Search the list of users to find your teaching assistant typing e-mail address to textbox at the bottom of the pop-up window.
- Find your teaching assistant among the search results and click "Enroll" button.
- Click “Finish enrolling users” button.
|
How to export students list with the information of groups?It is not possible to download the student list with group information directly, but it can be downloaded by adding a "Choice" activity that hidden from the students/guests. You can follow the procedures below to print all the students with their group information. - Click the "Turn editing on" button on the top right of your course page.
- Click "Add an activity or resource" option which will be activated at the bottom right of each week on your course page
- Choose "Choice" activity and click "Add" button.
- Fill out the "Choice name" section on the General tab.
- Fill out the "Option 1" section on the Options tab (you may type anything)
- Change the "Availability" option to "Hide from Students" in the Common Module Settings tab, and then create the activity by clicking the "Save and Display" button.
- When the activity is opened, you can download the student list together with the group information by clicking the "View 0 responses" option that appears on the right and clicking the "Download in Excel format" button on the page that opens.
|
How to extend time limitation for students with special needs?For activities with time limitation you can define time limitations for different students using "User Overrides". "User overrides" also allow you to give extra time for students with special needs. To define user overrides, you may follow these steps: - Create the activity (quiz, assignment, etc.).
- Click on the activity.
- From the activity administration block, click "User Overrides".
- Click "Add user override" button.
- Search the student by name or email address from the override user dropdown menu.
- Click the student name to select.
- Enable and define available time settings. The time settings depend on the activity. For example, for a quiz you will find open and close time as well as time limit, while for an assignment you will see allow submissions from, due date and cut-off date.
- Click on "Save" button.
- Repeat the previous steps for each student you will extend time limitations.
|
How to grade assignments?You can grade assignments in two ways: For the first option, follow the steps: - Click the assignment you have added.
- A new page will open, and click "View/grade all submissions" button on the page.
- A list of students with their names, ID numbers, status of submission, submitted assignments and, if applicable, submitted grade and feedbacks will appear.
- To grade an assignment, you need to click the box with "OK" sign on it in the "Grade" column.
- Enter the grade in "Grade out of" section for the selected person.
- If you wish, you can enter your feedbacks in "Feedback comments section.
- Click "Save changes" to finish grading.
For the second option, follow the steps: - Click "Grades" from "Course Administration" section on the left side of the page.
- A list with the names of the students, grade items and the grades you previously entered (if applicable) will appear.
- Click "Turn editing on".
- Empty squares will appear in the column of your assignment.
- Enter your grades in these squares.
- Click "Save changes" button.
|
How to hide a resource?- Go to course page.
- Click "Turn editing on" button.
- You will see "Edit" menu next to each resource or activity. Click "Hide" option from "Edit" menu. The resource will be grayed out which means until you unhide the resource students cannot reach it.
|
How to move a resource to another week?- Go to course page.
- Click "Turn editing on" button.
- You will see a four headed arrow, representing "Move" action, next to the resource title. Drag the title holding from the four headed arrow and drop to the desired week.
|
How to relate an outcome with a quiz?Once an outcome is defined at a course, it can be connected with activities. To connect an outcome with a Quiz activity, you may follow these steps: - Navigate to Quiz settings.
- Scroll down and click Outcomes title.
- A list of outcomes defined in the course will be shown. Select the outcome(s) you want to relate with the assignment by clicking checkboxes.
- Click 'Save and return to course" or "Save and display" button.
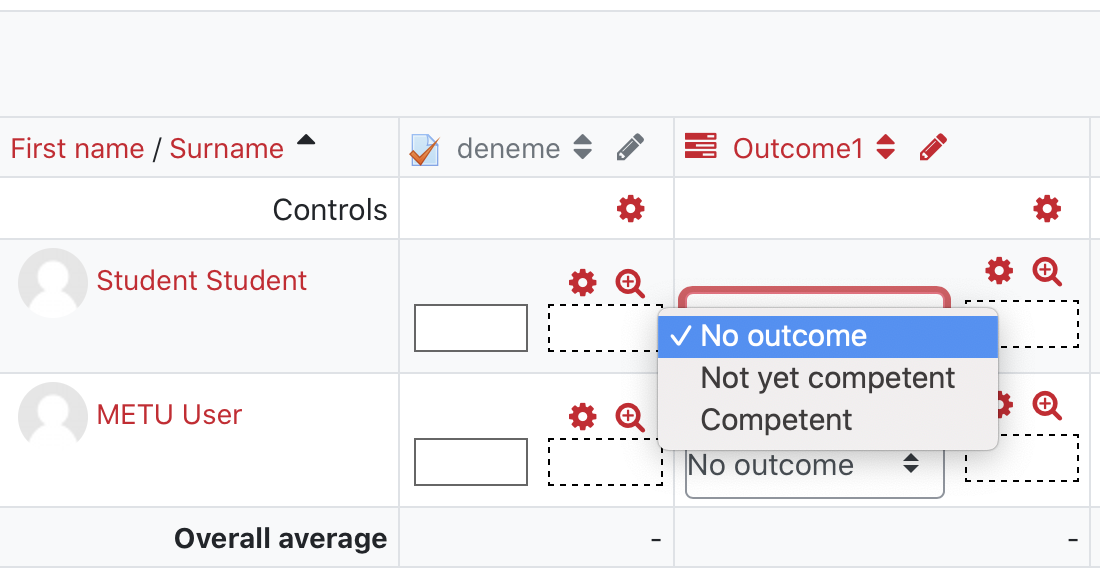
When an outcome is related with a quiz, a new column will be added to gradebook. Instructors can evaluate students' competency level for the outcome from Grades table. To evaluate outcomes on Grades table, you may follow these steps:
- Navigate to course page.
- Click Grades from Navigation block.
- Click 'Turn editing on' button.
- Select competency level from the dropdown menus for each student.
- Click 'Save changes' button.
|
How to relate an outcome with an assignment?Once an outcome is defined at a course, it can be connected with activities. To connect an outcome with an Assignment activity, you may follow these steps: - Navigate to Assignment settings.
- Scroll down and click Outcomes title.
- A list of outcomes defined in the course will be shown. Select the outcome(s) you want to relate with the assignment by clicking checkboxes.
- Click 'Save and return to course" or "Save and display" button.
Then, on Assignment grading page, a dropdown menu to evaluate the outcome will be added (as shown below). Select an appropriate value from the list. 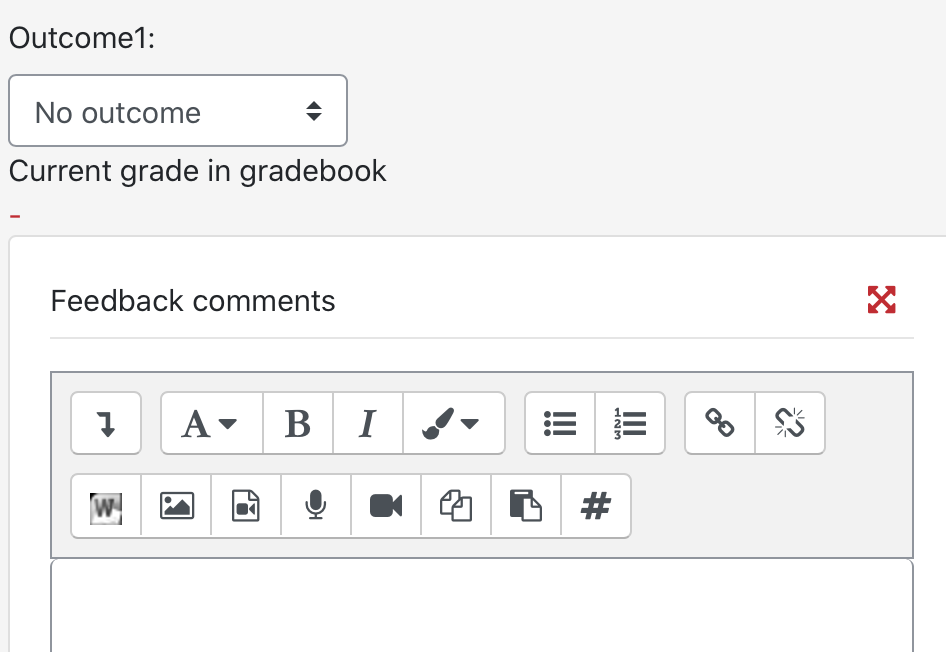
When an outcome is related with an assignment, a new column will be added to gradebook. Instructors may also evaluate students' competency level for the outcome from Grades table. 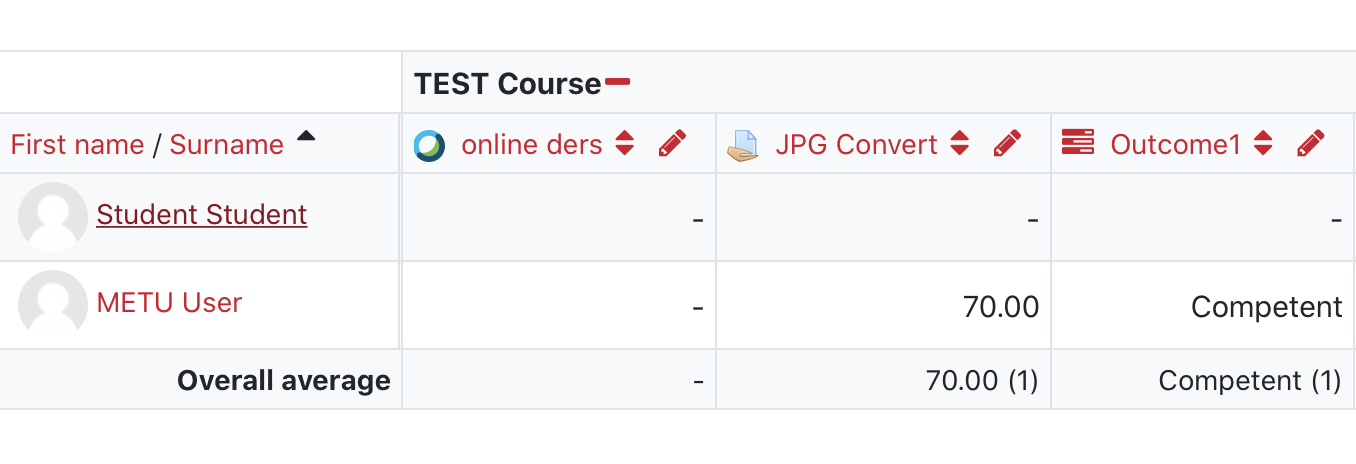
|
How to select an aggregation option?In order to calculate the course total, an correct aggregation option needs to be selected. To select/change the aggregation option you can follow these steps: Go to the course page. - Click "Grades" link from the Course Administration.
- On the top of new page, there is a setup menu of which first item is "Grader report". Select "Setup" from "Categories and items" section of the dropdown menu.
- A table will be opened. Click edit button.
- Click "Edit settings" menu on the dropdown menu.
- On the "Aggregation" column click on the dropdown menu and select option you need.
- Click "Save changes" button.
|
How to send e-mail to enrolled students?Quickmail enables sending e-mail to enrolled students. To compose a new e-mail you may follow these steps: - Click "Compose New Email" link from the Quickmail block located on the left of the course page.
- Select the recipients from the participants list.
- Type the subject.
- Attach files if you need.
- Compose the message.
- Click "Send Email" button.
|
How to share BigBlueButton recordings from previous semesters?If you have recorded your BigBlueButton (BBB) sessions in a previous semester and want to share these recordings with your students in the active semester, you need to add links of the recordings as URL resources to the new course. You can follow these steps: - Login to the previous semester which you have recorded your sessions.
- Navigate to the course page.
- Click on the BBB activity which has the recording.
- Click on the "Presentation". A new tab will be opened.
- Copy the link of the recording from the address bar. For example:
 - Login to the active semester which you will share your recordings.
- Navigate to the course page.
- Click "Turn editing on".
- On the section where you want to add the recording, click "Add an activity or resource".
- Select "URL" from the window.
- Type a "Name" for the recording. This name will be shown on the course page.
- Paste the link you have copied to "External URL" box.
- If needed, you can edit the other options.
- Click "Save and return to course" or "Save and Display".
|
How to share Webex cloud recordings from previous semesters?If you have recorded your Webex sessions in a previous semester to cloud and want to share these recordings with your students in the active semester, you need to add links of the recordings as URL resources to the new course. You can follow these steps: - Login to the previous semester which you have recorded your sessions.
- Navigate to the course page.
- Click on the Webex activity.
- Click on the "Recordings" tab.
- Click on "View Recording" for the recording you want to share.
- A window displaying the password to view recording will open. Click "Copy".
- Open a new tab in your Internet browser or a new browser window.
- Login to the active semester which you will share your recordings.
- Navigate to the course page.
- Click "Turn editing on".
- On the section where you want to add the recording, click "Add an activity or resource".
- Select "URL" from the window.
- Type a "Name" for the recording. This name will be shown on the course page.
- On "Description" text area, type "Password: " and paste the password to view recording.
- Return to the tab or window where Webex password window is open.
- Click "View recording".
- If the password is asked, paste the password you have copied.
- Click "OK".
- Copy the link of the recording from the address bar. For example:

- Return to the tab or window where URL activity settings is open.
- Paste the link you have copied to "External URL" box.
- If needed, you can edit the other options.
- Click "Save and return to course" or "Save and Display".
|
How to share Zoom cloud recordings from previous semesters?If you have recorded your Zoom sessions in a previous semester to cloud and want to share these recordings with your students in the active semester, you need to add links of the recordings as URL resources to the new course. You can follow these steps: - Login to the previous semester which you have recorded your sessions.
- Navigate to the course page.
- Click on the Zoom activity.
- Click on the "Cloud recordings" tab.
- Click on the title of the recording you want to share.
- Click on the "Share" under the recording of the session. If you like, you can also share Audio-only version.

- Copy the link of the recording from window. For example:

- Login to the active semester which you will share your recordings.
- Navigate to the course page.
- Click "Turn editing on".
- On the section where you want to add the recording, click "Add an activity or resource".
- Select "URL" from the window.
- Type a "Name" for the recording. This name will be shown on the course page.
- Paste the link you have copied to "External URL" box.
- If needed, you can edit the other options.
- Click "Save and return to course" or "Save and Display".
|
How to show average of grades to students?To show the means of grades, you may follow these steps: - Go to course page.
- Click "Grades" from Course Administration block.
- Click "Course grade settings" from Grade administration block.
- Scroll down to User Report section.
- Change "Show average" setting to "Show".
- Click "Save changes".
|
How to transfer a course from previous semesters?A course from one of the previous semesters may be transfered to the current semester by Backup - Restore actions. You may follow these steps: - Select the desired semester from ODTUClass Archive dropdown menu.
- Login using METU credentials.
- Go to course page.
- Click Backup option from the Course Administration.
- Click "Next" buttons to proceed.
- Click "Perform Backup" button on the last page.
- When the system completes the process click "Continue" button.
- Find the compressed file from "User private backup area" and click "Download" to download the file.
- Go to ODTUClass for the current semester.
- Go to course page.
- Click Restore option from the Course Administration.
- Drag the .mbz file that you have downloaded and drop it to Import a backup file area.
- Click Restore button.
- Click "Continue" button.
- Select Merge the backup course into this course option from Restore into this course section.
- Click "Continue" button.
- Click "Next" buttons to proceed.
- Click "Perform restore" button on the last page.
- When the system completes the process click "Continue" button and return to course page.
Warning: Please don't include Turnitin assignments, Zoom, Webex, BigBlueButton and Quickmail history in the backup file. |
How to transfer quiz questions from previous semester?You can user export and import functions of question bank to copy questions from previous semesters.
You may follow these steps: 1. Export Questions - Login to the semester you have prepared the questions.
- Navigate to the course page.
- Click Question Bank link on Course Administration block.
- From the options shown, click Export on Course Administration block.
- From File format options, select Moodle XML format.
- From Export category dropdown menu, you can select a category that includes the questions you want to export or leave it as Default for Course Name to export all of the questions.
- Write category to file and Write context to file check boxes should be checked.
- Click Export questions to file button.
- A document with .xml extension will download to your computer.
2. Import Questions - Login to the active semester.
- Navigate to the course page.
- Click Question Bank link on Course Administration block.
- From the options shown, click Import on Course Administration block.
- From File format options, select Moodle XML format.
- Drag and drop the xml file you have downloaded to Choose a file area.
- Click Import button.
|
How to unhide a resource?- Go to course page.
- Click "Turn editing on" button.
- You will see "Edit" menu next to each resource or activity. Click "Show" option from "Edit" menu.
|
How to upload assignments?In order to submit an assignment, you may follow these steps: - Go to your course page.
- Click on the name of the assignment.
- On the assignment page, you will see description and is available additional files. You can open/download files by clicking them.
- Click "Add submission" button which is under the Submission status table.
- Drag and drop your assignment file over the blue down arrow. Or you can copy and paste your assignment if there is a text entry box.
- Click "Save Changes" button.
- Review Submission Status table.
- You may edit your submission by clicking "Edit submission" button.
|
How to use MATLAB Grader?MATLAB® Grader™ is a browser-based authoring environment for creating and sharing MATLAB coding problems and assessments.
To add a MATLAB Grader activity to your course, please follow these steps: - Navigate to your course page.
- Click Turn editing on.
- Click Add an activity or resource on the section you want to add the activity.
- Click MATLAB Grader option on All tab.
- Type an Activity name which will be shown on your course page.
- Adjust other settings if you need. For instance, you may define the maximum grade for the activity or identify the activity as non-graded.
- Click Save and Display.
For more information, please visit the sample course: https://odtuclass2020sum.metu.edu.tr/course/view.php?id=431 Once you create the activity, you need to a add problem to that activity. For adding problems please visit: https://www.mathworks.com/help/matlabgrader/create-a-problem.html
|
How to use Safe Exam Browser?Safe Exam Browser is a web browser environment to carry out e-assessments safely. The software turns any computer temporarily into a secure workstation. It controls access to resources like system functions, other websites and applications and prevents
unauthorized resources being used during an exam. The quiz activity has built in settings to allow secure exams using the Safe Exam Browser. Safe Exam Browser is available for Windows, macOS and iOS as open source software. Students should install
Safe Exam Browser to their devices before the exams. For installation please visit: There are 3 options for Safe Exam Browser configuration in quiz activity: - Yes – Use SEB client config: No configurations of Safe Exam Browser are on Moodle side. The quiz can be attempted with any configuration of Safe Exam Browser.
- Yes – Configure manually: No template for the configuration of Safe Exam Browser will be used. You can configure Safe Exam Browser manually. In order to use this configuration, students must install the latest version of Safe Exam Browser application. In addition, MACOS users must check the "Allow Reconfiguring" and "Reconfiguring Config URL" options in the Exam tab of Safe Exam Browser configuration.
- Yes – Use an existing template: A template for the configuration of Safe Exam Browser can be used. Templates are managed by ODTÜClass Administrators. Students' manual settings will be overridden by the settings in the template. After
selection of this option a dropdown menu to choose a template will be displayed. In order to use this configuration, students must install the latest version of Safe Exam Browser application. In addition, users must check the "Allow
Reconfiguring" option and type "*" to "Reconfiguring Config URL" option in the Exam tab of Safe Exam Browser configuration.
Existing Safe Exam Browser Templates: - SEB Template 1
- Menu bar hidden.
- Students cannot change configuration.
- Links requesting a new browser window are blocked.
- Don't allow audio and video capture.
- Don't allow download & upload files.
- Don't allow network screen sharing.
- Don't allow to run inside virtual meachine.
- Don't allow spell check.
- Don't allow dictionary look up.
- SEB Template 2
- Menu bar hidden.
- Students cannot change configuration.
- Links requesting a new browser window are not blocked.
- Allow download & upload files.
- Don't allow audio and video capture.
- Don't allow network screen sharing.
- Don't allow to run inside virtual meachine.
- Don't allow spell check.
- Don't allow dictionary look up.
- SEB Template Zoom Allowed: Zoom is allowed to run in the background. Students should join the Zoom meeting before openning SEB.
|
I graded a Turnitin assignment but the grades are neither available in gradebook nor visible to students. What is wrong?Most probably you have graded the Turnitin assignment after "Post Date". Post date is the date when grades and feedbacks will be released to students. You need to grade submissions before this date otherwise the grades will not be shown in the gradebook. If the post date has passed, before grading edit the Post Date from Turnitin Assignment settings. |
I need a sign in sheet. How can I get it?You may use "Sign in Sheet" block to prepare and print an attendance sheet. To get the sign in sheet, you may follow these steps: - Go to course page.
- Click "Turn editing on" button.
- Select "Sign in Sheet" from "Add a Block" dropdown menu.
- A new block will be added to course page. Click "Generate sign in sheet" link on "Sign in sheet" block.
- Click "Print sign in sheet" to print the sheet.
You can sort by name or surname and filter due to groups. |
I want to assign different resources/activities to different groups of students. How can I do that?To assign different resources or activities to different groups of students using groupings: - Create groups:
Create groupings: - At the course page, click Users option from Course Administration.
- Click Groups option under Users sub-menu.
- Click Groupings tab.
- Click Create Grouping button.
- Type the Grouping Name.
- Click Save Changes button.
- Click "Show groups in grouping" icon at Edit column of groupings you have created.
- Select a group to add to the grouping and click Add button.
- Click "Back to groupings" button.
- Create as many grouping as you need. (Generally each group will be added to a grouping.)
Add an activity or resource: - At the course page, click Turn editing on.
- Click Add an activity or resource link.
- Select an activity or resource.
- Fill in the required fields.
- Adjust settings if required.
- Expand "Common Module Settings" section.
- Select "Separate groups" from "Group mode" dropdown menu.
- Select the grouping that you want this activity/resource be visible to from "Grouping" dropdown menu.
- Check Available for group members only box to hide this activity/resource from others.
- Click Save and return to page button.
|
I want to check how much time my students spent on course. How can I do that? |
I want to schedule an activity and students will select from available sessions. Which activity should I use?You can use Choice activity. You may follow these steps: - Go to course page.
- Click "Turn editing on" button.
- Click "Add an activity or resource" link.
- A new window will open. Select "Choice" and click "Add" button.
- Complete the fields marked with by *.
- From "Options" section select "Yes" from the "Limit the number of responses allowed" dropdown menu if you want to limit the number of students for each session.
- Type each session information into an "Option" field.
- Type the maximum number of students of each session to the "Limit" field of the related Option.
- From "Availability" section you can restrict answering time.
- Click "Save and return to course" button.
After your students select the available sessions, to get the list you may follow these steps: - Go to course page.
- Click the Choice activity you have created.
- Click "View N responses" link. N is the number of students who have responded.
- You can download the responses.
|
I want to send an e-mail to all students? How can I do that?You can use Quickmail which is a block that provides selective, bulk emailing within courses and is one of the default blocks of ODTUClass courses. To send a message to all enrolled students you may follow these steps: - Go to the course page.
- Click "Compose New Email" link on Quickmail block.
- From "Role filter" dropdown menu select "Student".
- Click "Add All" button to add students to recipients list.
- To attachment field you can add files.
- Type the subject into the "Subject" field.
- Type your message into the "Message" field.
- If you want to receive that email, click "Yes" next to "Receive a copy".
- Click "Send Email".
|
I'm the instructor of a course but I cannot see the course on my course list/dashboard. What should I do?Instructors are enrolled to courses automatically on ODTÜClass according to Student Information System (SIS). If you cannot see your course on ODTÜClass, please check these: 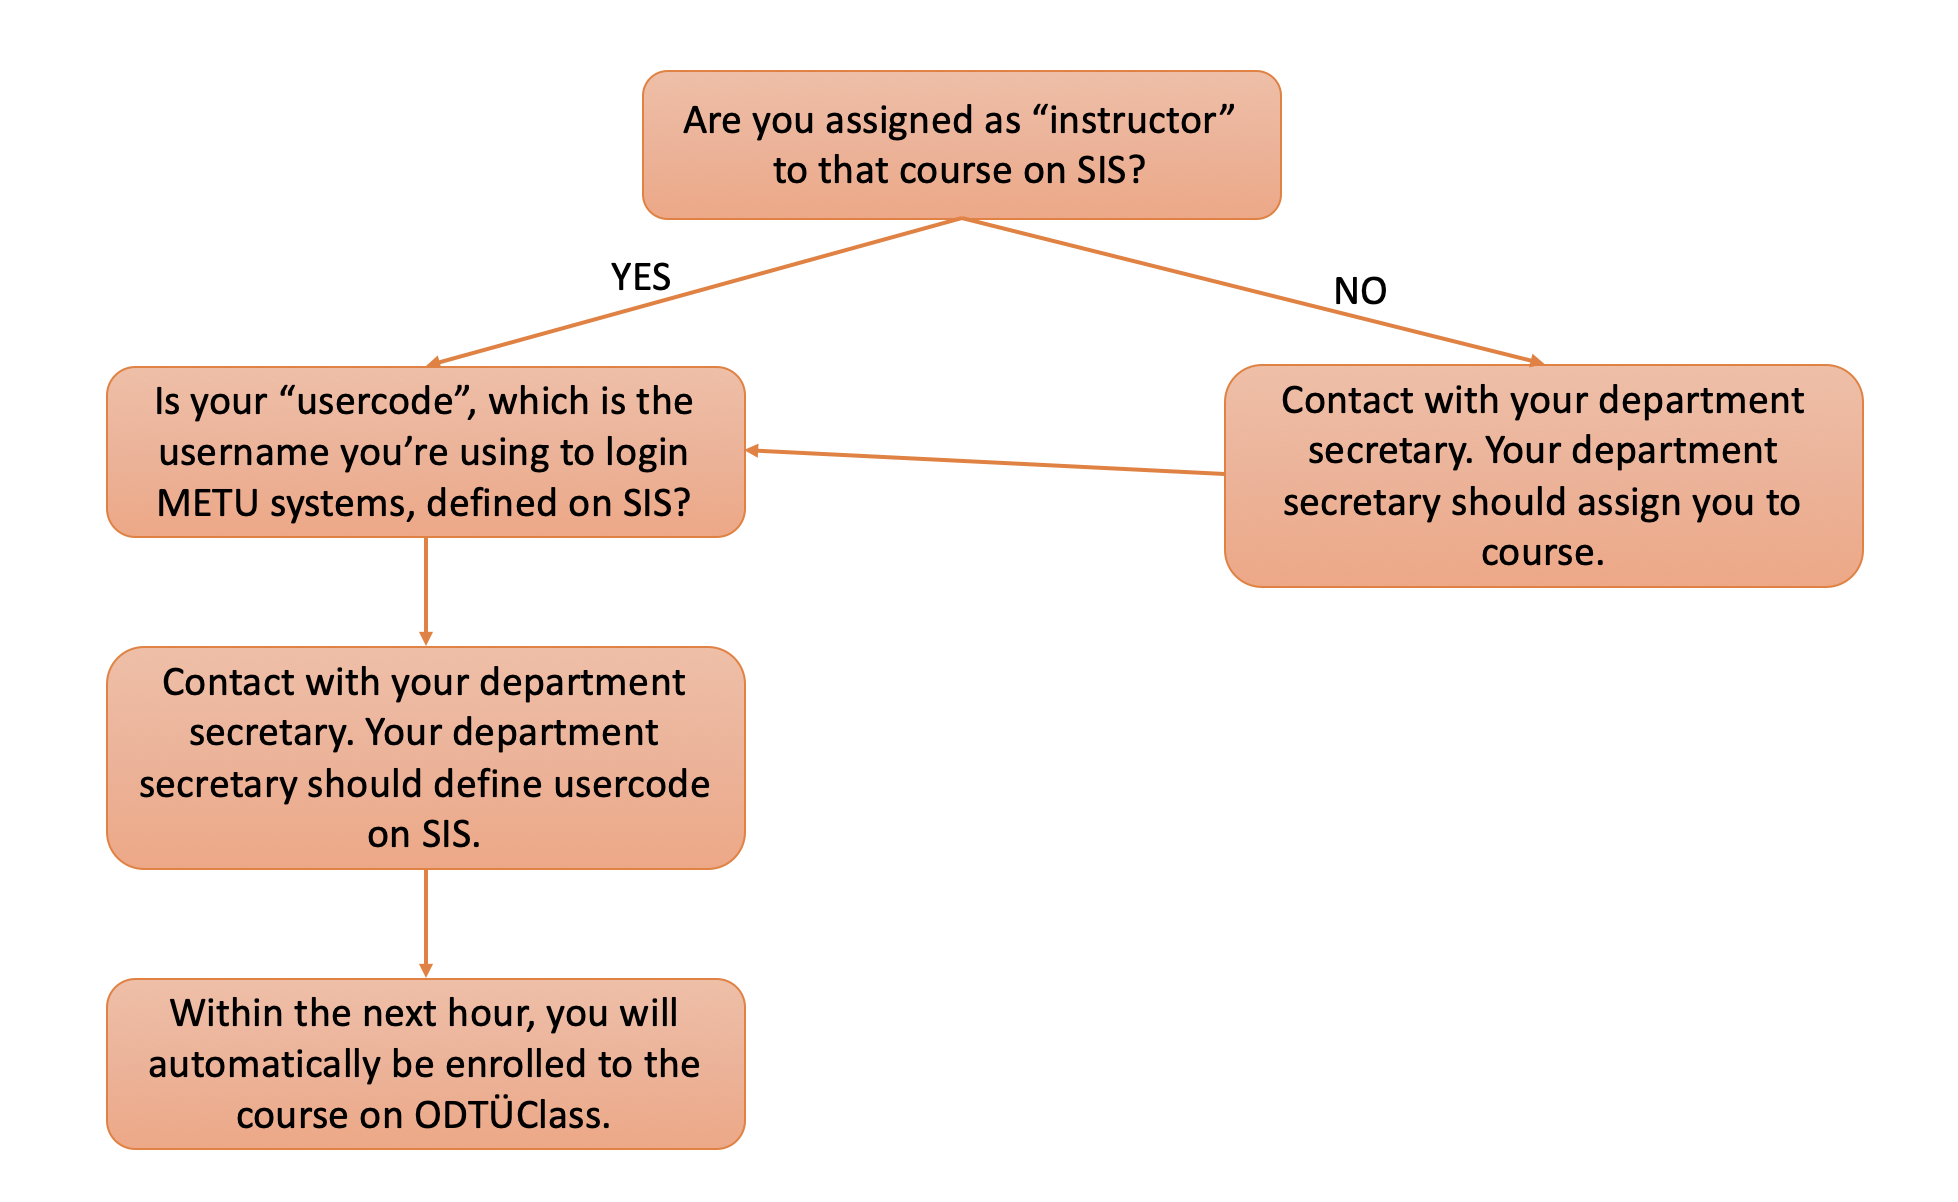
If you still don't see your course at ODTÜClass, please contact odtuclass@metu.edu.tr.
|
Is it possible to regrade Calculated type quiz questions automatically?It is not possible to correct Calculated type quiz questions after the quiz is opened. Thus, questions should be regraded manually. To regrade Calculated type quiz questions, you can follow these steps: - At the course page, click the quiz.
- Click "Results" menu from "Quiz Administration" block.
- Click "Manual Grading" under “Result” section.
- Click “Also show questions that have been graded automatically” link in the opening page.
- Find the question regraded in the table and click “Grade all”.
- In the "Options" section, select one of the "By student ..." options from "Order attempts" drop-down menu.
- Click "Change options" button.
- Grade all students' answers manually.
|
Is there an app for mobile devices? |
My name is wrong. How can I correct it?ODTUClass gets user information from ODTU central servers, therefore you can not change user information on ODTUClass. For your questions and problems, you can reach Hotline via "Contact Us" link on METU Computer Center web site or e-mail to hotline@metu.edu.tr. For Frequently Asked Questions please visit http://faq.cc.metu.edu.tr/. |
Students cannot see their Turnitin Assignment grades. How can they see their grades?If students cannot see their Turnitin assignment grade, “Marking workflow state” of the assignment has been marked as “Not market”. To make students see their Turnitin assignment grades, you can follow these steps: - At the course page, click the assignment.
- Click “View All Submission” button in the assignment page.
- Click “Select” at the top of the student list.
- Select “Set marking workflow state” from "With selected ..." drop-down menu at the bottom of the student list and click “Go” button.
- Select “Released” from "Marking workflow state" drop-down menu in the opening page.
- Click “Save changes” button.
|
Students could not see images in questions in the quiz. How can this problem be fixed?If almost all students see images in the questions and few of them cannot see, it is possible that there could had been an instant connection loss during quiz. When students refresh the page, they should see the image in the questions; if quiz time was not finished or students did not click “finish attempt” button. It does not matter whether the quiz done by safe exam browser or not. The SEB templates in ODTÜClass enable reload in exam. But there is a very important point that each question has to be in a different page. If questions are in the same page, when students refresh the page all answers students gave will be cleaned. Another point should be care about that the size of the image. If size of the image is so big, there is a possibility that image should been unable to load due to internet connection. We suggest you to prepare images using text editor. For example, for a table in the question text, text editor should be used instead of inserting table as an image. |
What are Outcomes?Outcomes are specific descriptions of what a student has demonstrated and understood at the completion of an activity or course. Each outcome is rated by some sort of scale. In simple terms outcomes are similar to sub components of a grade. A grade is
an assessment of overall performance that may include tests, participation, attendance and projects. Outcomes assess specific levels of knowledge through a series of statements, that maybe coded with numbers or letters.
Instructors can create
outcomes for their courses and then connect outcomes with activities such as assignments or quizzes. As the outcome is connected with an activity, a new column is added to gradebook.
How to add Outcomes?
How to relate an outcome with an assignment?
How to relate an outcome with a quiz?
For more information: https://docs.moodle.org/39/en/Outcomes
For other sources: https://www.youtube.com/watch?v=f4NS1_7crLA
https://www.youtube.com/watch?v=qjfxBztsqX4
|
What are the permissions of a "Restricted Teaching Assistant"?Restricted teaching assistants can add, edit and delete resource and activities, grade assignments but can not view or edit gradebook. |
What are the permissions of a "Teaching Assistant"?Teaching assistants have the same rights as Instructors do including permissions to add, edit and delete resource and activities, grade assignments as well as edit gradebook. |
What is "Restrict Access"? |
What is a "Turnitin Assignment"?Turnitin, is a web-based plagiarism detection software. The student papers are compared with millions of resources including journals, web pages and other student papers. The results of comparison are presented by an Originality Report. “Turnitin Assignment” integrates ODTUClass and Turnitin with prevents instructors and students to visit turnitin.com cause papers are submitted to Turnitin via ODTUClass. Instructors can view originality reports, grade submissions and provide feedback via ODTUClass. How to add a "Turnitin Assignment" |
What is aggregation?The aggregation dropdown menu lets you choose the aggregation strategy that will be used to calculate each participant's overall grade. There are different options: - Mean of grades: The sum of all grades divided by the total number of grades.
- Weighted mean: Each grade item can be given a weight, which is then used in the arithmetic mean aggregation to influence the importance of each item in the overall mean.
- Simple weighted mean: The difference from Weighted mean is that weight is calculated as Maximum grade - Minimum grade for each item.
- Sum of grades: The sum of all grade values.
- Mean of grades (with extra credits)
- Median of grades
- Smallest grade
- Highest grade
- Mode of grades
For more information: https://docs.moodle.org/26/en/Category_aggregation |
What is course dedication block?This block allows to calculate estimated dedication time of participants within a course. Estimated dedication time is calculated using click, session and session duration. To enable Course Dedication block you can follow these steps: - Go to course page and click "Turn editing on" button.
- Click Course dedication option from Add a Block dropdown menu.
- Click "Dedication tool" button on the Course Dedication block.
- Select the time frame that you want to calculate the eastinated dedication time.
- Click "Calculate" button.
- The estimated dedication times of participants will be displayed.
- You can export the table as an Excel sheet.
For more information: https://moodle.org/plugins/view.php?plugin=block_dedication |
What is Group Choice?Group Choice allows students to enroll themselves in a group within a course. The instructor can select which groups students can choose from and the maximum number of students allowed in each group. How to add a Group Choice activity? |
What is Mass Actions Block?This block allows instructors to perform actions upon multiple resources or activities, rather than having to perform repeated actions on individual items. For example, to hide all resources and activities of a week Mass Actions Block offers a practical solution. Supported actions include mass selection, indentation, deletion, hiding, showing, and moving. First, you need to add a Mass Actions Block to your course. To add a Mass Actions Block you may follow these steps: - Go to course page.
- Click "Turn Editing On".
- On the left side of the page "Add a block" section will appear.
- Select "Mass Actions" from the dropdown menu.
To apply a mass action you may follow these steps: - Go to course page.
- Click "Turn Editing On".
- Checkboxes on the right side of activities and resources will appear.
- Click the chechboxes you want to apply the action.
- Click the desired action from the Mass Actions Block.
|
What is Quickmail?Quickmail is a block that provides selective, bulk emailing within courses and is one of the default blocks of ODTUClass courses. By clicking "Compose New Email" on Quickmail block you can select participants by group or role, attach files, add subject and compose your message. You can either send your message or save as a draft. |
What is STACK question type?The STACK system is a computer-aided assessment package for mathematics, which provides a question type for the Moodle quiz. In computer-aided assessment (CAA), there are two classes of question types.
- Selected response questions
In these questions, a student makes a selection from or interacts with, potential answers which the teacher has selected. Examples include multiple-choice, multiple response and so on. - Student-provided answer question
In these questions, the student's answer contains the content. It is not a selection. Examples of these are numeric questions.
STACK concentrates on student-provided answers which are mathematical expressions. For example, a student might respond to a question with a polynomial or matrix. Essentially STACK asks for mathematical expressions and evaluates these using computer algebra. Please visit STACK Demo course for examples and practice. |
What's MATLAB Grader?MATLAB® Grader™ is a browser-based authoring environment for creating and sharing MATLAB coding problems and assessments. Since it's integrated to ODTÜClass, instructors don't need to visit MATLAB® Grader™ to create assignments. For more information, please visit the sample course: https://odtuclass2020sum.metu.edu.tr/course/view.php?id=431
|
Where are the courses which I taught at previous semesters?You may find the courses from one of the previous semesters using "ODTUClass Archive" dropdown menu at ODTUClass main page. |
Where is the list of students?You can display the list of participants including students and teaching assistants by following these steps: - Go to the course.
- Click "Participants" link on the "Navigation" block which is located on the upper left corner.
|